
Behind The Scenes: The Making of the Children's Book Many Little Squiggles

Since Many Little Squiggles is launching in October, I thought it'd be fun to give you a glimpse into the book-making process by showing how the book's first four spreads came to be. First, I'll walk you through the creation of the text on those spreads and how it evolved during the writing and editing phases of the project. Then, I'll walk you through the illustration and book design phases of each spread. Hopefully, it'll give you a condensed view of the many steps involved in creating the book and serve as a fun way to see how everything has come together over the last several months. Let's start with the text:
The Text
When I started writing Many Little Squiggles back in 2023, I generally knew what the story would be about. Using One Little Squiggle as a jumping-off point, I wanted to write a story where the squiggle was now free to change size, shape, color, etc. I wanted to see if changing the squiggle would set readers' imaginations free and allow them to create even more unique squiggle art than before.
Even though I had a decent direction for the story from the start, that didn't necessarily mean that I knew exactly what to write. (If only writing worked that way!) So, I started the first draft by typing out every idea that came to mind- the good, the bad, and the ugly. The following picture shows the first draft of the text for the book's first four spreads:

As you can see, it's messy...really messy. Some might even say it's all over the place, but I'm okay with that. After all, that's what first drafts are for...getting any and all ideas on paper...even the bad ones. If you look closely, a lot of the text that ended up in the book is there. It's just buried beneath a bunch of other ideas. That's where editing comes in.
Once all of my initial ideas had been purged onto the paper, it was time to start weeding through them and shaping the story. At this point, I had to ask myself some tough questions: What is the best inviting question to bridge the gap from One Little Squiggle to this book? What is the best way to introduce the squiggle's new variations? What should this book's refrain be? Should it mirror the refrain from One Little Squiggle or have its own unique flair? The list goes on and on. After pondering each of these questions and weeding through the ideas in Draft 1, I narrowed down the text to this:

You'll notice that Draft 2 is much closer to the text that ended up in the final book. It was simply a matter of unburying the best ideas in Draft 1. That being said, the editing didn't end there. In fact, it was far from over. I spent the next several months playing around with the text and trying different things to see what worked and what didn't. I moved text around, tried adding character dialogue, played with several different squiggle variations, and continued revising the book's inviting question and refrain until I came up with this version of the text, which equated to Draft 9:

Draft 9 doesn't look that different from Draft 2, but that's okay. After trying all of those other things and giving each of them thoughtful consideration, I was much more confident in the text choices in Draft 9 than I was in Draft 2. I had to try those other things to be confident and satisfied with the text.
At this point, I felt like I had self-edited the text as much as I could, and I was ready to send it off for professional editing. I had the pleasure of working with a new professional editor for this book, Frances Gilbert, and these were Frances's notes related to this section of the text:
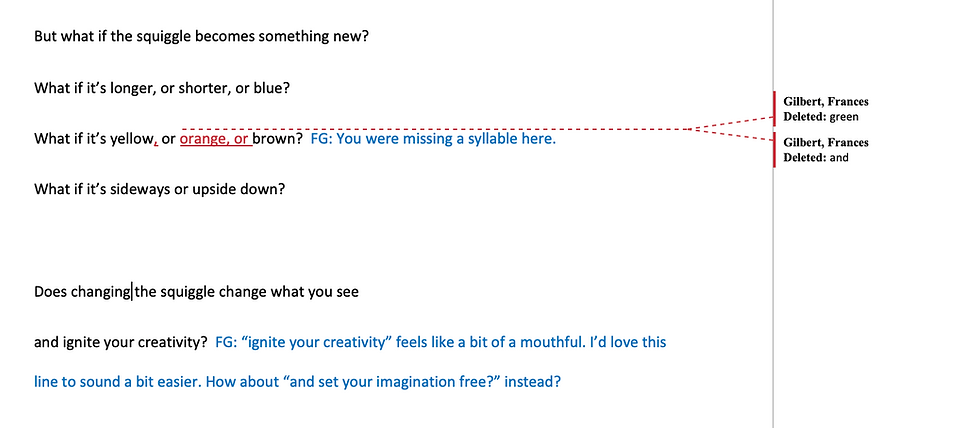
Taking Frances' comments into consideration, I performed another round of edits and ended up with this as the final text for the first four spreads:

You'll notice that I didn't incorporate Frances's exact suggestions, but I did my best to incorporate her feedback in a way that felt right for the book. She suggested "orange" instead of "green" to add a missing syllable. I chose "purple" instead. It adds the missing syllable and incorporates one of my all-time favorite colors into the text. Frances thought "ignite your creativity" was a mouthful, so, even though I loved that part, I changed "ignite" to "spark" to ease the flow of the words for the reader. Ultimately, I think Frances would approve of this final text, and I hope you do, too!
Moving on...this is the fun part! Now, I'll show you how each of the first four spreads came to life through the illustration and book design phases of the project. Let's dive in!
Spread 1
Once the book's text had been self-edited (9 times!) and professionally-edited and was as polished as it could be, I sent the story to Illustrator Polina Gortman, and she created rough sketches for each spread in the book. Here is the rough sketch for the opening spread:

The rough sketches are a crucial step in the illustration process because they allow Polina and I to make sure that we're on the same page (pun intended) when it comes to the general content, composition, and layout of each illustration before Polina spends a bunch of time creating detailed pictures. It gives us an opportunity to brainstorm different directions for illustrations and make sure that the pictures flow well from one page to the next.
With this particular illustration, Polina hit the nail on the head from the start. I loved how she captured the characters and their cat, and I didn't see anything that needed to change. So, Polina went ahead and created the following final sketch:

As you can see, the final sketch is much neater and more detailed, and it includes the text on the page in the approximate location that it will be in the final book. This allows us to make sure that we leave enough room for the text in the final art.
From here, Polina digitally painted the illustration in Procreate to create the final art:

Voila! This is the final art that ended up on the book's first spread. You'll notice that this artwork does not include the story's text. That is because the text is added later by the book designer, whose job it is to pull together all of the book's components (text, illustrations, covers, front and backmatter, etc.).
Once Polina had completed the final artwork, I sent her artwork and my final manuscript to Book Designer Lauren Gallegos, and Lauren went to work putting everything together. She chose the font, shaped the text into a squiggle, and placed it on the page so that the final spread in the book looks like this:

Pretty cool, huh? Here's one more look at the process we used to create Spread 1. Scroll through the photos below to watch the spread come to life:
Next, we'll walk through that same process for spreads 2-4:
Spread 2
Spread 2 was similar to Spread 1 in that Illustrator Polina Gortman created a beautifully-composed scene from the start. This is what her initial rough sketch looked like:

The rough sketch didn't require any tweaking at all- just refining it to create this final sketch:
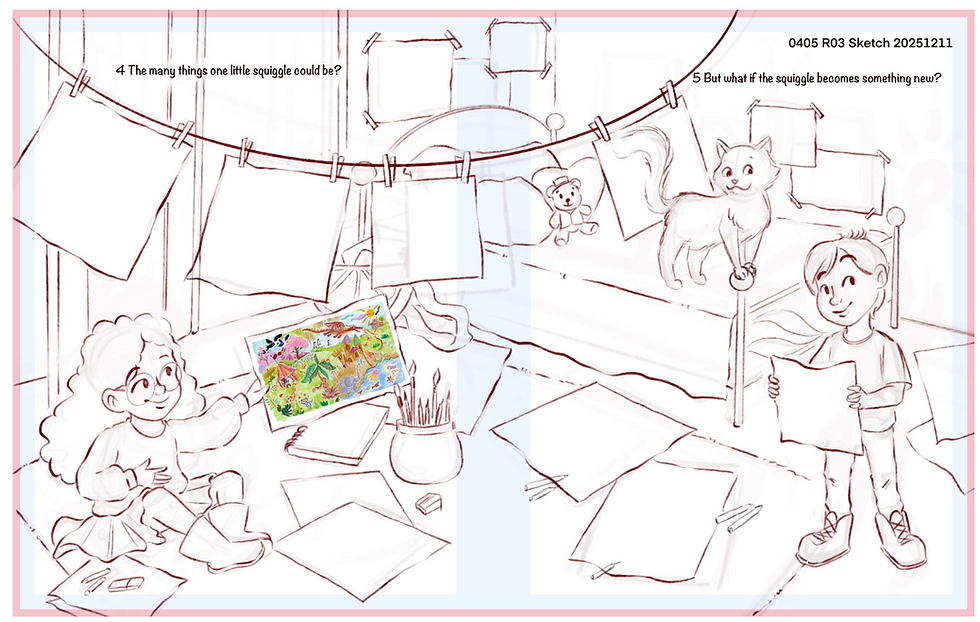
Here, Polina cleaned up the lines, added details, and added the final mural from One Little Squiggle as one of the girl's masterpieces. Then she set to work digitally painting the sketch to complete her portion of the final art:

At this point, we had one extra step to complete with this spread: adding the public squiggle art. I photographed and uploaded each public squiggle art masterpiece, and Polina placed the masterpieces in the blank boxes reserved within her artwork, turning her final art into this:
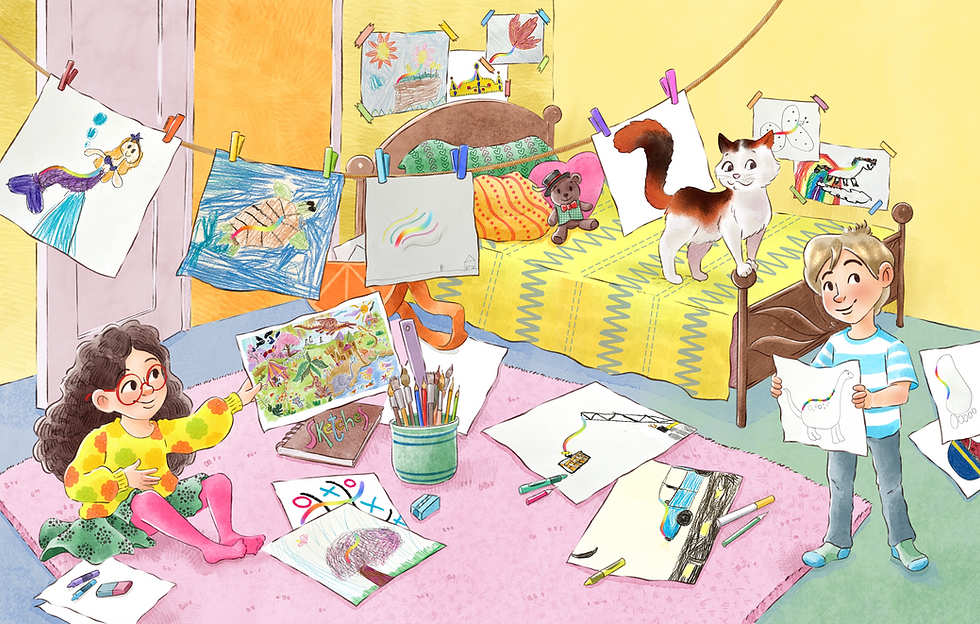
Finally, it was time for the book design. Again, Book Designer Lauren Gallegos took my text and artfully placed it onto the finished artwork.

Although this design looked great, I asked Lauren to make two small changes to the text:
Break-up the text on the left-hand page into three lines instead of two (This helps guide the reader in finding the cadence of the rhyming text.)
Move the text up on the right-hand page to provide more space between the text and the squiggle art
Lauren happily obliged both requests, so the final spread looks like this:

Once again, scroll through the photos below to watch Spread 2 come to life:
Spread 3
Here's Polina's initial rough sketch for Spread 3:

We made a few minor changes to this rough sketch, including adding the girl's glasses and satchel to all three places where she is pictured, adding the cat next to the kids in the background of each page, and adding new Squiggleville characters to both boats. Here's Polina's final sketch that incorporates these revisions:

Next, Polina digitally painted the sketch to create this final art:

Isn't it beautiful? This is one of my favorite spreads in the whole book! I love how Polina composed this scene- it's so full of whimsy and adventure! At this point, Lauren took over and added the text to the spread. This is her original design:

After review, Lauren and I decided to break-up the text, placing the words closer to the corresponding squiggles in Polina's illustration. So, Lauren shifted the text around and came up with this:

This is what the final spread looks like in the book, and it turned out even better than I imagined! Here's one more look at how this spread evolved:
Spread 4
Spread 4 followed a similar process, so we'll cut to the good part. Go ahead and scroll through these photos to see the spread come to life:
And, before we go, here's one more look at the final versions of the first four spreads as presented in the book:

Wow! I love these opening spreads, and I hope you do, too! As you can see, this book did not come together overnight. It took many, many months and a lot of hard work by our entire creative team to make it a reality. I hope that you've enjoyed this preview of the first four spreads, and I hope that this article has given you a greater understanding of the book creation process and a greater appreciation for the final product. I'm really proud of this book, and I can't wait to share it with all of you in October!
For a behind-the-scenes look at the book's cover creation process, read Cover Reveal: Many Little Squiggles. For the book's latest publishing update, check out the book page. Otherwise, stay tuned. More book launch info is coming soon!


Comments